Format Wd Elements For Mac
A lot of people face issues when they try to connect their external hard drives to their Mac devices. This is because of the differences in file format between windows and Mac systems.People often search things like how to make WD elements compatible with Mac so that they can use their external HDD without any issue. Having an External HDD that isn’t supported on Mac devices can be an issue for professionals who need to consistently transfer files from one type of computers to another. Hence in order to keep your work flow smooth and without any obstructions, it will be better to get your HDDs formatted into formats that are supported across all the operating systems that are used generally. Does WD Elements Work with MacBy default, a WD Elements HDD cannot work on Mac computers as they are formatted in NTFS format. This format is not supported on Mac devices and you will not be able to access the hard drive. The differences in formats cause issue in reading the hard drive and in order to be able to use it universally across your entire device, it is important to first reformat the drive into a supported format.Common Formats of WD Elements DriveMost commonly WD elements come with NTFS format which is not supported by Mac by default.
It is important to check the formats before you buy external HDD as not all the HDDs are supported across both devices. Some versions might also be available in FAT32 and ExFAT formats, which are widely supported across different types of operating systems and devices.Does WD Elements Work on MacDepending upon the format in which HDD is created, it may or may not work on Mac devices. Most of these hard disks are formatted into NTFS format that is only supported on windows PCs. If you want to buy WD elements that work on Mac, ask the shopkeeper to give you an HDD that has HFS+ format as it is supported by Mac devices or you can go for file formats like ExFAT and FAT32.How to Make WD Elements Compatible with MacAs WD element is a popular external hard disk, more and more people prefer buying it due to their reliability. Because of the fact that Windows PCs are more popular, they generally come with NTFS format. The only way to be able to use these hard disks on your Mac is by reformatting it into other formats like Journaled, ExFAT or FAT32 formats as they are supported across all the devices.Part 2. How to Format WD Elements for MacDue to the differences in the operating systems, most of the ED elements external hard disks don’t work natively on the Mac OS powered devices.
Apr 16, 2020 Can I use WD hard drive on Mac and PC? You can find effective ways here to format WD My Passport for Mac and PC to FAT32 or exFAT file system with the help of the professional format tool - EaseUS Partition Master or other solutions. What's more, you can share digital files between Mac and Windows system easily.
In order to get over this hurdle, it becomes necessary to format the hard disk into a format that is widely supported. How to reformat WD elements for Mac you ask? Well, it is quite easy to begin with and can easily be done across different devices so that it can be used with cross platform usage features.
There is no requirement of any third party application to be able to do so and the processes are quite easy as well.What’s the Best Format of WD Elements for MacChoosing the perfect format to which you will reformat the hard disk in can be quite tricky as there are a lot of formats and they have their own pros and cons. For example, ExFat systems have limitation over size of partitions, FAT32 systems are not widely found and Mac OS’s Journaled formats will only work onMac OS powered devices. Hence in order to choose the right format you will have to understand your requirement.If you primarily use Mac OS devices only then it will be better to go for Mac OS journaled formats as they have little to no limitations for partitions and file sizes. But if you like to use it across all the devices, it will be better to convert it to HFS+ formats as it is supported on Android, Windows and Mac OS without any issue and there are no limitations that make it any less useful than NTFS systems.How to Format/Reformat WD Elements for MacDepending on the system that you are using, there are 2 ways to format you hard disk into a Mac supported format. One is by using the indigenous file format option in the windows OS powered computers and other is through the similar tools found in the Mac OS.
Have a look down below to understand how to format WD elements for Mac using Windows as well as Mac OS devices-How to format WD elements se for Mac on Windows Operating system?Step 1. Connect your hard disk with the computerConnect the hard disk to computer using a USB cable and wait for a bit so that the device can be recognized. Once that is done, click on the “This PC” option and find the icon that represents the Hard disk.Step 2. Click on the format optionRight click on the hard disk icon and browse through the options to find the format option.
Click on it and you will now see a dialogue box with options like File system, Volume Label etc. Click on the File system option and look for the available formats.
Select the one that you wish to continue with and then enter a relevant name for the hard disk in the Volume name option.Step 3. Format the driveOnce you have set everything as per your requirement, select the ‘quick format’ option and press the start button. Wait for a few moments and your drive will be formatted into the set format.How to format WD element on your Mac device?Step 1. Connect the WD elemental hard disk to your Mac powered deviceConnect your Hard disk to your computer and wait for a bit so that the system can recognize and mount the drive so that it can be used. Once it does recognize the disk, a Hard disk shaped icon will appear on the desktop.Step 2. Go to the disk utility optionGo to the finder option from the Mac OS dock and open it.
When it opens, select the Go option from the menu bar and after that, click on utilities. Now you will be able to see things like, application/utilities etc. Go to the utility option and select the disk utility application.Step 3.
Choose the hard drive you want to formatNow after opening the Disk utility option, select the external drive connected with your device that you wish to format.Step 4. Select the format optionsNow click on the Erase option from, the disk utility file menu.
You will now see a new dialogue box will appear. From here you will have to customize the format in which you want the hard disk to be formatted to. Also set the new name of the hard disk as per your requirements.Step 5. Erase the driveOnce everything is done according to what you wanted, click on the erase option and within a few seconds, your hard disk will be formatted.Part 3. How to Recover Formatted WD Files on MacWhen external hard disks are formatted, it becomes next to impossible to recover files that were stored in it. There are a few third party tools that can help you to do so with ease. While formatting your hard disk, it is important to make sure that there are no important files or folders present inside the hard disk that are not backed up yet.If such files exist in your external hard disk, make sure that you make the backup before formatting your hard disk as once you initiate the format option, you will not be able to recover any of the files.The Consequence of Formatting WD AccidentallyA lot of people tend to initiate format option by accident and this can cause a lot of issues for them.

The following are some of the primary ones that they face-.If you don’t regularly backup your data, you might end up losing a lot of important files and folders.Your hard disk might also become corrupt and unusable after you format it quite often by mistake.How to Recover Formatted WD Elements Drive FilesIf your WD elements has got corrupted, damaged, is unreadable or was accidentally formatted, there is little that can be done to recover the data. However, there are a few applications like the that can help you to gather and retrieve lost or corrupted files that you want. It can be used on both Mac as well as windows powered devices and are extremely easy to use as well. The tool is available to be downloaded and used for free on the official website and doesn’t require high end PC to work properly.
It can easily repair corrupted videos, files etc. The following are the steps that can help you to recover the files with the help of Recoverit data recovery tool-Step 1. Select the drive you wish to recover the data fromDownload, install and launch Recover it data recovery tool on your Mac. Once done, select the drive that you wish to repair and get the data out of. If you already know the exact folder, select it and then press the start button to proceed.Step 2. Location will be scannedNow recover it will scan the location you have provided thoroughly with the help of advanced algorithms.
All the deleted, corrupted andhidden files and folders will appear in the tool after the scan is complete. The best thing about the tool is that the scanning can be customized with the help of a lot of filters that can make scanning faster and more efficient, also it allows the user to pause and resume the scanning as per their convenience.Step 3.
Preview the filesNow you will have list of all the files that could be found in that location. Browse and search the file that you wanted and click on it to preview bit. If everything seems fine, select the file and click on the recover option, select the location where you want to store the file and then start the process. You file will be recovered and restored within a few seconds.Part 4.Tips for Formatting WD Elements for MacWD Elements is a very popular external hard disk that is used by a lot of people around the world.
Using yourWD Elements drive for both your home Mac and work Windows PC means. A 1TB, 2TBor larger drive could make your life so much easier. Because both of your computerscan get to the same document.After allhow else could you so easily move, look at and work on your docs on bothcomputers?And it’squick and easy for you to do on your iMac or MacBook Pro or Air.And you canfind out here.
Top LevelView of Formatting WD Elements for a Mac and a PC1. Connectup your WD Elements drive to your Mac2. You useDisk Utility.
First to format your WD Elements external drive to Mac OSExtended (Journaled) file system.3. Then youquickly follow up by formatting to ExFAT.4. Thenyour Western Digital external hard drive is ready to use on your Mac and onyour Windows PC.Ahead ofStarting Your WD Elements Mac and PC FormattingYou’ll needyour Mac on and you logged in.You maywant to think about connecting your MacBook Pro or Air to external power. Why?Because youdon’t want your Mac’s battery to fail half way through formatting your WesternDigital Elements drive.
And because theUSB cable powers your Elements drive. It’s taking its power from your Mac.
You’llwant to make sure there’s enough power to drive the drive.Your WD Elements drive comes with a cable that has a type A connector that plugs into your Mac. USB A Cable EndDo you havea Macbook Pro 2015, 2016, 2017, 2018? Yes?Your Mac will have a port and you’ll need an adaptor cable.They areeasy enough to get on Amazon.Want to find out more about connection options for your Mac?.You mayalso need to use the adaptor cable on your Windows PC if it has USB C ports onit.All pluggedin?Great youcan start. How toFormat WD Elements for Mac and PC?The stepsbelow will format your WD Elements drive so that the whole drive is shareable.This means that both your Mac and PC can see all the drive.Side Note:Erase will wipe any files you have on your WD Elements drive. If you have files on there and you want tokeep them, copy them off onto a Windows PC first. Can yousee your WD Elements external drive on your desktop? Finder Window Search For Disk UtilityThe yellowarrows in the above picture shows you where.
Pickyour Western Digital Elements Drive.Once DiskUtility has started up you’ll see the Disk Utility pop up window.On the lefthand side of your pop up window you’ll find the drives attached to yourMac. Your Mac’s internal disk drive is underthe heading ‘Internal’. And you’ll find your Elements drive under the‘External’ Heading. Click to select yourWD Elements drive.Be sure topick it at the top level. The yellow arrow shows you where.
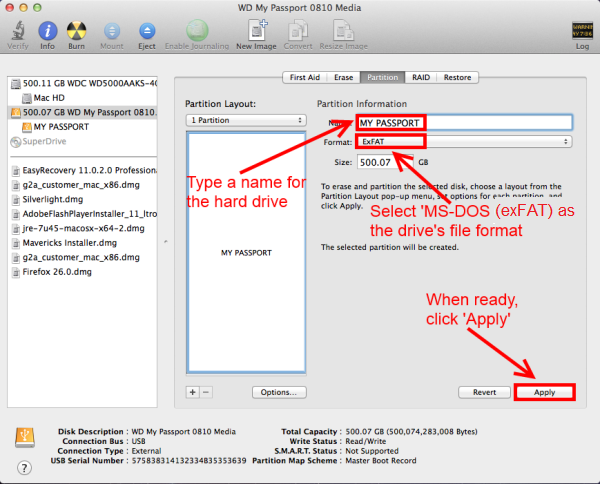
WD Elements Format Pop up Window 5. Giveyour WD Elements Hard Drive a Name.You’ll begoing through this stage of the formatting twice. Giving the name Untitled at this point isfine.This firsttime round you format your Elements drive to Mac OS Extended (Journaled) filesystem.Choose thatoption for the drive format. The red arrow on the picture shows you where toclick.
By clicking there you open up the up down arrows to expand the list ofavailable file formats.Pick GUIDPartition Map for the scheme.Then Clickon Erase on the bottom right of the pop up window.DiskUtility now takes a few minutes to format your WD Elements drive.Your drivewill change from NTFS to Mac OS Extended (Journaled) file system.Once yourformatting is done. NowFormat Your WD Elements Drive as ExFATGo though steps 3 and 4 again.This timewhen naming your drive choose a name that is easy for you to remember. Onethat’ll help you know exactly what you’re using your WD Elements drivefor. Sharing between a Mac and a PC.This timeyou select the file system format of ExFAT.
WD Elements Selecting Exfat in Disk UitilityChoose theScheme as GUID Partition Map as you did before. Click toErase.You Clickon Erase on the bottom right hand corner of the pop up window.And in afew minutes your WD Elements drive is ExFAT formatted ready for you to use onyour Mac and Windows PC.Your WDElements drive will be on your Mac’s Desktop under the name you gave it.Now yourentire WD Elements external hard drive is in a format both computers can use.You cancreate folders.
Copy files from your Mac onto your Elements drive.Plug yourWestern Digital Elements drive into your PC.Work on documents on the drive and put docs from your PC onto the drive.And whenyou plug back into your Mac your Mac can see and use those files. What if youwant a separate area on Your WD Elements drive for Mac and PC?You would dothis by creating partitions on the hard drive.Think ofpartitions as slicing your WD Elements drive into different size pieces. And youuse each piece for different things.Say you maywant two partitions.One partition for your back up of your Mac.And anotherfor both Mac and your PC to share files.Thepartition that you want your Mac to use for backup you format as Mac OS Extended(Journaled) file system.YourWindows PC will not see that partition when you plug your Elements drive intoyour PC.Thepartition you want to share with both Mac and Windows you partition as ExFAT. To FormatYour WD Elements With a Partition for Mac and PC 1. Follow steps 1 through to 5 above.Your whole drive is now formatted as Mac OS Extended (Journaled) file system.Once youhave formatted your Western Digital Elements drive 2. In DiskUtility, Click on Partition.At the topof your Disk Utility screen you’ll see the button to partition. WD Elements Create 2nd PartitionThe largecircle is a picture showing your whole disk.
When you click + you’re tellingDisk Utility to create a second partition.Disk Utility splits your WD Elements drive into two equal parts. Click onthe New Partition.Click onthe picture of your WD Elements drive. Click on the side of the picture withyour unnamed partition.Give thepartition you plan to share a name.ChooseExFAT for the format. And GUID Partition Map for the scheme. Don’twant Equal sizes?If youdon’t want a 50/50 split. Then you can type in the size you want eitherpartition to be. Right there on the screen where it says size.The picturewill move and adjust to show you the percentage each partition has.

ClickApply.When you’rehappy press Apply.Your Macwill create the partitions, and format them as you want. And after a shortwhile your partitioning is done.And yourpartitions will appear on your Mac’s desktop as drive icons. PC and Time Machine Partition IconsYou candouble click on them to open up finder windows. Finder windows that you cancopy and paste to and drag and drop to. Why Doesn’tYour WD Elements Drive Work Out of the Box on your Mac and PC?ships the Elements external hard drive formatted as NTFS.This meansyour PC will be able to use the drive right away.Your Mac can read the files on an formatted WD Elements drive but can’t update those files.
Or put more files on the Elements Drive.ExFATluckily is a file format that both your Windows PC and your Mac can use.Plug yourWD Elements drive into either and they can see all the files on the drive. Notonly that, they can write files onto the drive.This makesthe drive completely shareable.Saving youmoney because you won’t have to use a more complicated way to share files.And all thefiles you want to use are right there on the one drive. Last WordsAnd now you can relax because you have your WD Elements drive formatted for your Mac and PC. You’ve formatted your WD Elements for a Mac and PC. And now you can get on with sharing your files between them both.You’ll find other documents here all about your WD Elements drive. Please take a look.